A bathroom remodel can feel like a hundred small decisions in a row. Tile. Paint. Lighting. Fixtures. Then, at the end, the “glass part” shows up and suddenly you have new questions: What thickness should a frameless shower use? Do I need special safety glass? Will my mirror look wavy? And how do I keep the glass clean in North Texas hard water?
This guide is for Dallas-Fort Worth homeowners who want modern, clean lines and a straightforward process. It focuses on two upgrades that fit most remodel plans: a frameless shower enclosure and a properly sized vanity mirror. It also covers a few safety and maintenance basics that help you avoid common mistakes.
If you want a quick overview of why homeowners love frameless showers, this short post is a good companion read:
https://alexsglassco.com/the-benefits-of-frameless-shower-glass-why-its-the-ultimate-dfw-bathroom-upgrade/
Key choices that change the final result
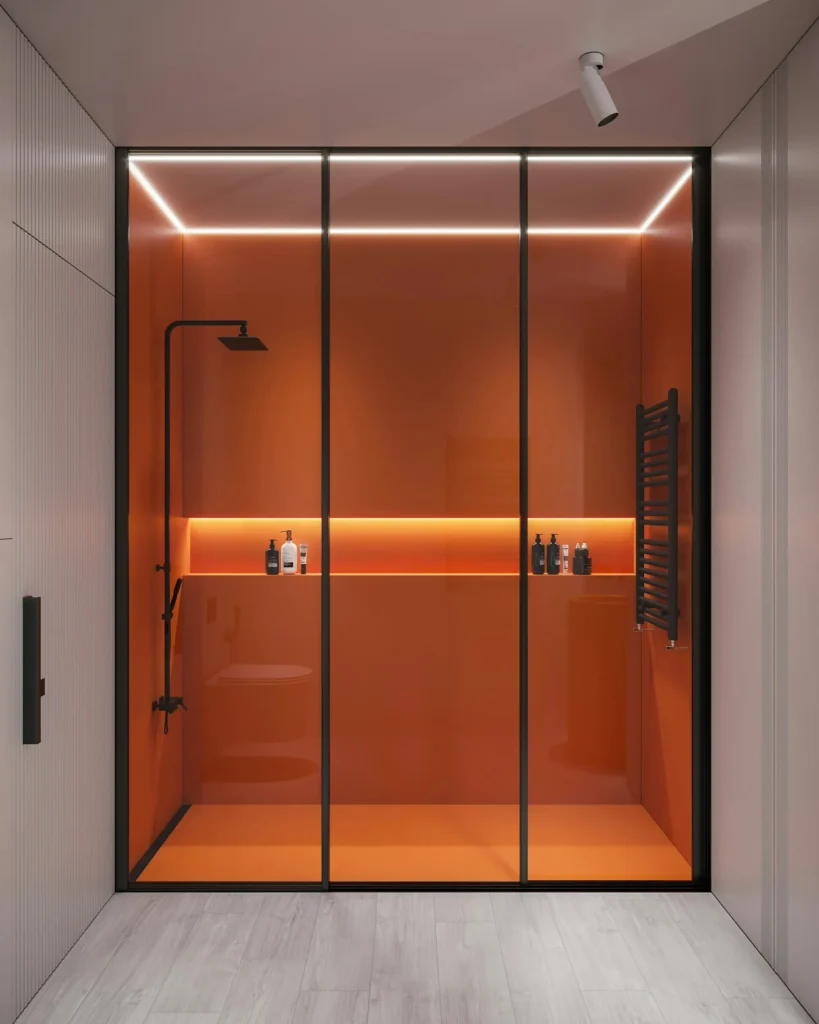
Many “frameless shower” photos look similar online. The difference between an average result and a great one usually comes down to planning details: which safety standard applies, how the glass is supported, what thickness makes sense for your layout, and whether you’re designing the mirror and lighting together.
Safety glazing for showers is not an optional detail.
Shower doors and enclosures are covered by the federal safety standard for architectural glazing materials (16 CFR Part 1201). In plain terms, glazing used in shower doors and enclosures is expected to meet safety requirements aimed at reducing serious injury if glass breaks from human contact. This is one reason reputable shower door work uses safety glazing (commonly tempered safety glass) rather than standard annealed glass.
Frameless shower glass thickness should match the layout, not just the look.
Frameless showers typically use thicker glass than framed doors. Thicker glass helps panels feel solid, supports premium hinges and clamps, and tends to stay flatter across wider spans.
At Alex’s Glass Company, frameless shower doors are built with 3/8″ or 1/2″ tempered glass and premium hardware. Those thickness options are both normal for frameless work, but the best choice depends on the specifics of your opening and panel plan.
To get a more accurate quote (and avoid mid-project changes), decide these basics early:
The layout: door-and-panel, corner, return panel, or steam shower configuration.
The door swing: which direction you want the door to open.
The finished surfaces: tile completed, curb width finalized, and the shower pan/curb slope finished.
A frameless shower is typically installed near the end of a remodel, because it relies on finished surfaces and finished dimensions.
Hardware finishes are “small,” but they control the whole aesthetic.
Glass itself is neutral. Hardware is what ties the shower door to the rest of the bathroom. If your faucet and light fixture are matte black, a chrome hinge set can look out of place even if the glass is perfect.
Alex’s Glass Company installs premium shower hardware in finishes like chrome, black, brushed, and brass. If you are still shopping fixtures, picking your hardware finish alongside your lighting choice helps the whole room look intentional.
Plan for water management (especially if your shower head points toward the door).
Frameless showers are designed to look minimal, so they are not built to block every drop of water the way a bulky framed door can. If your shower head sprays toward the door opening, you can reduce splashing with smart layout choices (like putting the fixed panel in the “splash zone”) and clean silicone lines in the right places.
Don’t forget nearby bathroom glass, especially windows.
Bathrooms sometimes have a window inside the shower area or close to wet zones. During a remodel, you may realize that window glass (or a nearby glass door) also needs attention for safety or comfort.
For safety, this guide can help you understand where tempered or laminated glass is typically needed and how to tell what you have:
https://alexsglassco.com/safety-glass-dfw-tempered-vs-laminated/
For comfort and efficiency, U.S. Department of Energy explains that window performance is commonly described using U-factor (non-solar heat flow; lower is generally more efficient) and solar heat gain coefficient (SHGC; lower means less solar heat admitted). ENERGY STAR certification for windows and doors is based on U-factor and, where applicable, SHGC requirements by climate zone.
If you are already replacing insulated glass units (IGUs) during a remodel, this guide can help you think through upgrades like Low‑E glass without replacing the whole frame:
https://alexsglassco.com/dfw-low-e-igu-glass-upgrade-guide/
Vanity mirror choices that make a bathroom feel finished.
A custom mirror is one of the fastest ways to make a “new tile + old mirror” bathroom feel complete. The size, edge finish, and thickness influence how premium it looks.
Most homeowners decide on three mirror details:
Width: mirror same width as the vanity, slightly wider, or wall-to-wall.
Edge finish: polished edges for a modern look, or beveled edges for a decorative touch.
Lighting coordination: centered under a vanity light, or sized to fit between sconces.
If you want a deeper mirror guide (including seams for large walls and cutouts for outlets or sconces), see:
https://alexsglassco.com/custom-mirror-installation-dfw/
Mirror thickness: 1/8″ vs 1/4″ (quick comparison)
| Mirror thickness | Pros | Cons | Recommended uses |
|---|---|---|---|
| 1/8″ | Lighter; can work well for smaller mirrors on flat walls; often a lower-cost option | Can show wall waves more easily; less rigid for large spans | Smaller vanity mirrors; very flat walls; tight budgets |
| 1/4″ | More rigid; helps reduce visible distortion on larger spans | Heavier; may cost more; needs the right mounting approach | Larger vanity mirrors; feature walls; home gyms; “premium finish” remodels |
What to expect: quoting, measuring, and installing (plus care tips)
The most common frustration in remodel projects is timing. People order glass too early (before tile is finished) or too late (after everything else is done). The smoother approach is to plan early, measure late, and install after finished surfaces are complete.
If you like to understand pricing before you commit, these posts explain how glass quotes are usually built and what information helps the fastest:
https://alexsglassco.com/dfw-glass-replacement-quote-guide/
https://alexsglassco.com/free-quotes-for-glass-replacement-in-dfw/
What a good measurement appointment covers.
A proper site measure is where your installer confirms final opening dimensions, checks for out-of-level walls, verifies door swing clearance (toilet, vanity, towel bars), and sets hardware placement. This is why shower glass is usually measured after tile and grout are complete.
Clean install details that matter after the crew leaves.
Two installs can look similar in photos but feel different day to day. The difference usually comes from finishing details: straight silicone lines, even gaps between panels, smooth door operation, and a final cleanup that does not leave grit behind.
If you want a quick visual example of clean custom glass work, see a recent mirror install here:
https://alexsglassco.com/frameless-mirror-installation-in-wolfe-city-tx/
Care tips that actually protect glass long-term.
In North Texas, the biggest enemy of shower glass is mineral residue and soap film that builds up when water dries on the surface.
For routine cleaning, the National Glass Association guidance on architectural glass recommends soaking glass with clean water and a mild, non-abrasive solution, using non-abrasive tools, and avoiding routine use of razor blades or metal scrapers. It also warns that cleaning in direct sunlight can be a problem because the glass surface can be too hot for optimal cleaning.
In real life, that translates to simple habits:
Squeegee after each shower so water does not dry on the glass.
Clean weekly with mild products and soft tools.
Avoid making “aggressive scraping” your first option.
Mirrors have one extra rule: keep liquid away from the edges.
The National Glass Association’s mirror cleaning guidance emphasizes keeping mirror edges dry to reduce edge damage (often called “black edge”). It recommends clean warm water and a soft cloth, warns against acid/alkali cleaners and abrasives, and advises not spraying cleaner directly onto the mirror.
If you want a simple cleaning baseline from our blog that also supports good habits for shower glass and mirrors, see:
https://alexsglassco.com/how-to-clean-your-homes-windows/
Final tip: coordinate glass with lighting before fabrication.
If you are adding sconces, moving a vanity light, or adding outlets near the vanity, plan that before a mirror is fabricated. Planning first helps you avoid awkward compromises like a mirror that ends too low, a light that feels off-center, or last-minute cutouts you didn’t expect.
A bathroom glass upgrade should not be the stressful part of a remodel. If you make a few early decisions, then allow for a proper measure after finishes are complete, your shower and mirrors can be the clean “final step” that makes the entire space feel finished.
Sources used for the safety and care basics in this post:
https://www.ecfr.gov/current/title-16/chapter-II/subchapter-B/part-1201
https://cdn.ymaws.com/iwca.org/resource/resmgr/techincal_questions/updated_proper_procedures_bu.pdf
https://www.glass.org/sites/default/files/2021-08/FB06-05_2019_Proper_Procedures_for_Cleaning_Flat_Glass_Mirrors_0521.pdf
https://www.energy.gov/energysaver/energy-performance-ratings-windows-doors-and-skylights
https://www.energystar.gov/products/res_windows_doors_skylights